In this tutorial I will cover how you can use Let’s Encrypt with Certbot/Lego to generate a FREE SSL certificate that you can use on your personal website. Along with how to set it up to auto-renew. Please refer to my other tutorials on how to generate an SSL certificate manually after purchasing it from an authority.
If your site is hosted somewhere else and you’d like to host it onto Lightsail, please follow my other tutorial here.
I will assume that you already have a Lightsail account on Amazon Web Services and you already have a WordPress site with a domain attached to it. If not, please follow this tutorial first.
First ensure you have a backup of your instance, just in case something goes wrong (I faced some issues the first time around, but the snapshot saved me 😅) – details in later sections in case you need to restore the snapshot.
Ledger Manager
Check out my iOS app which facilitates recording crypto transactions (Bitcoin, Ethereum, etc.), simplifies tax reporting & reports on overall net worth!
*Everything is synced privately on your iCloud account.
**Helps getting your crypto tax reporting in order (Form 8949) with smart calculation of cost basis & acquisition dates.
STEP 1: Install Let’s Encrypt Certbot and Lego
Visit your lightsail dashboard, then click on the “Connect using SSH” button to open terminal and SSH into the instance.
- Type to navigate to
cd tmp/ - Enter this command to download the latest version of lego:
curl -Ls https://api.github.com/repos/xenolf/lego/releases/latest | grep browser_download_url | grep linux_amd64 | cut -d '"' -f 4 | wget -i - - This will download that file onto the “tmp” director. Let’s install it (please note, you need to ⚠️ change the X Y Z to the version that was listed in the output of the command above. At the time of this writing, it was “…_v3.6.0_…“):
tar xf lego_vX.Y.Z_linux_amd64.tar.gz - Execute those commands to create a directory and move lego there:
sudo mkdir -p /opt/bitnami/letsencryptandsudo mv lego /opt/bitnami/letsencrypt/lego
🏁 Up until this point, you should have installed lego.
STEP 2: Generate a Let’s Encrypt Certificate
- Stop your current instance:
sudo /opt/bitnami/ctlscript.sh stop - Request a new certificate for your domain, with and without “www” (⚠️ change the current email address and domain to your own):
sudo /opt/bitnami/letsencrypt/lego --tls --email="me@karlboghossian.com" --domains="karlboghossian.com" --domains="www.karlboghossian.com" --path="/opt/bitnami/letsencrypt" run - This will prompt you to access terms, just hit “Y” and ENTER to proceed.
🏁 This should have already created the certificates under /opt/bitnami/letsencrypt/certificates/. Now we need to configure the server to use them.
STEP 3: Configure the Web Server to Use The Created Let’s Encrypt Certificate
That step will create symbolic links to the certificates in the letsencrypt/ directory for the server.key and server.crt. As well backing up the current files to append .old so that we can restore them if needed. ⚠️ Make sure you change the lines that reference my personal site to your own domain.
sudo mv /opt/bitnami/apache2/conf/server.crt /opt/bitnami/apache2/conf/server.crt.oldsudo mv /opt/bitnami/apache2/conf/server.key /opt/bitnami/apache2/conf/server.key.oldsudo mv /opt/bitnami/apache2/conf/server.csr /opt/bitnami/apache2/conf/server.csr.oldsudo ln -sf /opt/bitnami/letsencrypt/certificates/karlboghossian.com.key /opt/bitnami/apache2/conf/server.key- ⚠️ Make sure to change the “karlboghossian.com.key” part to yours!
sudo ln -sf /opt/bitnami/letsencrypt/certificates/karlboghossian.com.crt /opt/bitnami/apache2/conf/server.crt- ⚠️ Make sure to change the “karlboghossian.com.key” part to yours!
sudo chown root:root /opt/bitnami/apache2/conf/server*sudo chmod 600 /opt/bitnami/apache2/conf/server*
🏁 Now type ls -la /opt/bitnami/apache2/conf to see the symlinks that were created and where everything points.
STEP 4: Test Your Site
- First you want to restart your server:
sudo /opt/bitnami/ctlscript.sh start - Visit “https://karlboghossian.com” to validate your site is loading.
- In case it doesn’t, I faced some issues the first time around (before I wrote this tutorial) where I had to restore my instance from AWS Lightsail dashboard.
- If you need to do so:
- Click on the Snapshots under your instance in Lightsail dashboard.
- Then click the “…” button and “Create from Snapshot” option.
- Don’t worry, this is the only way to restore the snapshot by creating a new one, then updating your static IP to point to the new one (as if nothing happened).
- After the new instance is up and running.
- Click on the Static IP for the original instance, that should show you the instance it’s attached to (i.e.: the original one)
- Click on detach.
- Click and select the new instance.
- Click attach.
🏁 At this point, if you visit karlboghossian.com, you should see the site loading just like before (of course without SSL/https).
STEP 5: Configuring Proper Redirects / Update WordPress to use SSL
You might notice that Chrome will say that it’s not fully secure, or even Safari won’t display the lock yet. Let’s fix that!
- First you need to update the access file for
wp-config.phpfile:sudo chmod 666 /opt/bitnami/apps/wordpress/htdocs/wp-config.php - Go to your wordpress admin dashboard for your site.
- Navigate to Plugins > Add New
- Search for “Really Simple SSL!” > Install > Activate
- It will alert you to make a backup, feel free to do it (I didn’t).
- Under the Settings for that plugin, there’s a toggle for 301 redirect. If you enable it, it might say that it doesn’t have write access to
htaccess.conf, so you can either add the block of code they provided, or just make it fully writable (chmod 666that file), and toggle the switch back ON and save..htaccessfile is located at:/opt/bitnami/apps/wordpress/htdocs
- Then revert the permission for
htaccess.conftochmod 644. - Revert the
wp-config.phpfile back:sudo chmod 644 /opt/bitnami/apps/wordpress/htdocs/wp-config.php
🏁 Visit your site as is (without https://) and it should automatically redirect. If it doesn’t, it could be because you tried to http:// earlier and your browser cached your preference. Notice that if you click anywhere on your site, you might see the https:// automatically added. Just try with another browser or another device. Eventually your browser will start to go there automatically.
STEP 6: Final Touch Ups
I did have to go through the site real quick and republish a few pages. I noticed the logo initially was missing (it couldn’t load the image). And some other blog posts had an image missing. I simply edited the blog post that was missing the image, and clicked the image > deselected > selected that same image > publish.
🏁 At this point your site should be loading fine with images and everything working. Last step is to deal with renewals, as you know the Let’s Encrypt certificates are valid for 90 days only.
Renewing the Certificate
The Let’s Encrypt certificates usually have a 90 days lifespan. So they have to be renewed every 3 months. There are two methods to renew the certificate, either manually or automate it using a cron job.
OPTION 1: Manually Every 2-3 Months
Execute the following command (of course update the email and domain to your own): sudo /opt/bitnami/letsencrypt/lego --tls --email="name@example.com" --domains="example.com" --domains="www.example.com" --path="/opt/bitnami/letsencrypt" renew --days 90
OPTION 2: Automatically Renew Certificates Before They Expire
That’s the better approach as it doesn’t require you to do anything on the long run.
- Create a script at
/opt/bitnami/letsencrypt/scripts/renew-certificate.sh:sudo nano /opt/bitnami/letsencrypt/scripts/renew-certificate.sh - Enter the following in the file that was just created (of course make sure to update the email/domains to your corresponding info):
!/bin/bash

sudo /opt/bitnami/ctlscript.sh stop apache
sudo /opt/bitnami/letsencrypt/lego --tls --email="name@example.com" --domains="example.com" --domains="www.example.com" --path="/opt/bitnami/letsencrypt" renew --days 90
sudo /opt/bitnami/ctlscript.sh start apache
- Exit the editor (Ctrl + X), then save changes, hit ENTER.
- Basically, the steps are to stop the apache server, execute the manual
renewcommand in the section above, then start the server again. - Knowing that you created the symbolic links above in STEP 3, any generated certificate will end up under
letsencryptdirectory, which will automatically be pointed at by the link.
Now we need to create a cron job that will execute that script periodically.
- Make the script executable:
sudo chmod +x /opt/bitnami/letsencrypt/scripts/renew-certificate.sh - Execute the following to open the crontab editor:
sudo crontab -e- If it asks which editor to use, I picked the
nanooption 2.
- If it asks which editor to use, I picked the
- Scroll to the end of the file and add the following, which will run on the 1st day of every month:
0 0 1 * * /opt/bitnami/letsencrypt/scripts/renew-certificate.sh 2> /dev/null - For more info on cron job time format in case you’d like to pick a different time and day: https://crontab.guru/
NOTE: If renewing multiple domains, remember to update the /opt/bitnami/letsencrypt/renew-certificate.sh script to include the additional domain name(s) in the lego command.
🏁 Congratulations! You setup a cron job that will run periodically and renew your certificate 🤩.
DST Root CA X3 Expiration (Sep 2021)
You might have heard that Let’s Encrypt will be making changes to how older browsers and devices trust their certificates.
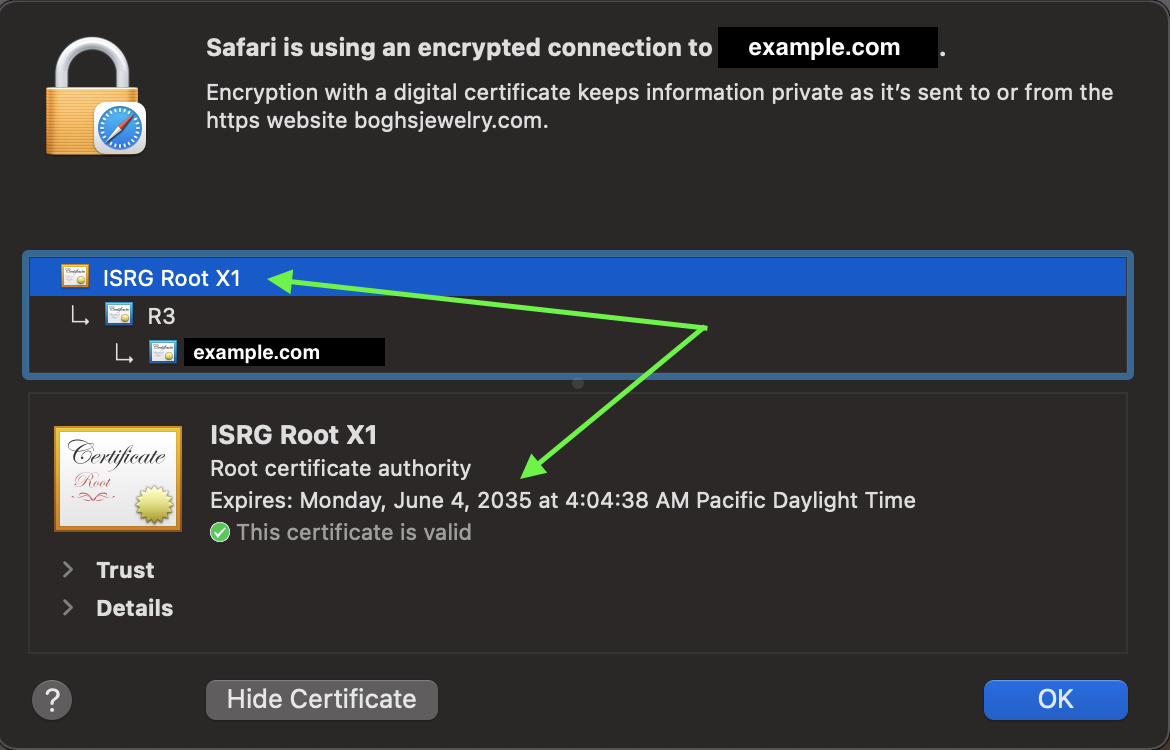
They claimed that most people won’t be affected, and you’ll be fine for the most part. Except one of my domains was affected and displayed the treatment saying that my website isn’t secure and might be stealing sensitive info…

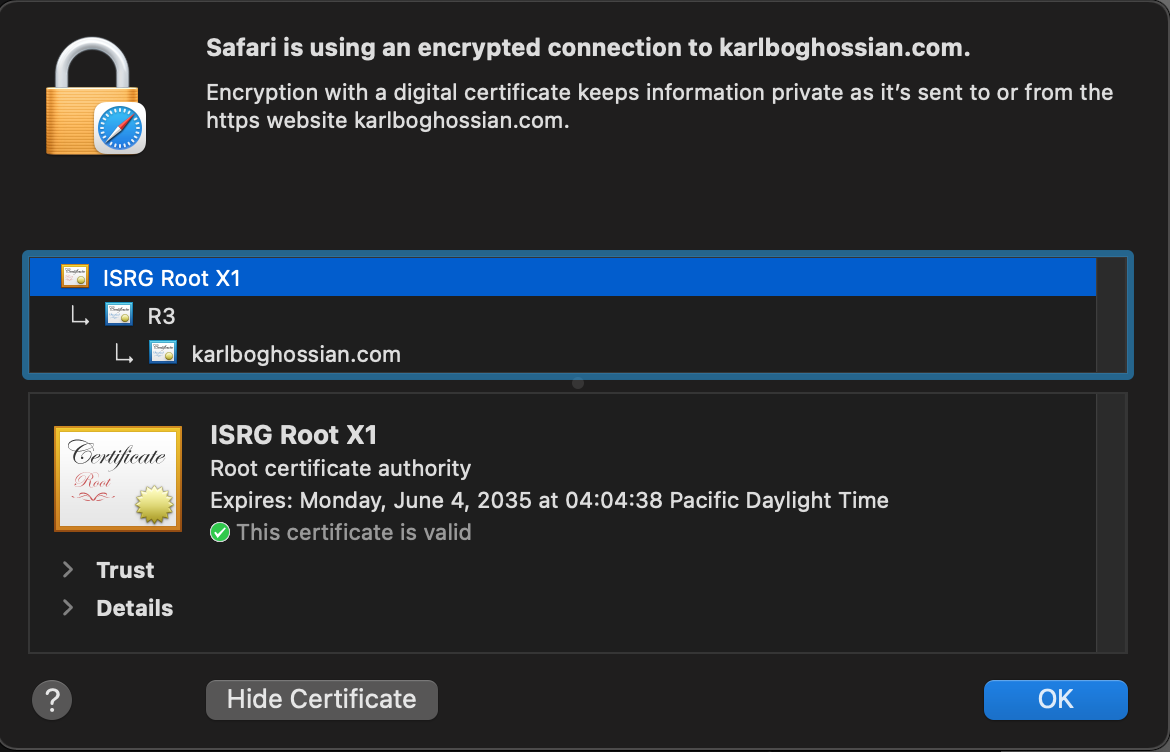
When I inspected that certificate, it was apparent that my website wasn’t able to migrate over as the “Expired” line showed September 30, 2021. Especially after comparing it with this (karlboghossian.com) website’s certificate which expired in 2035:
Solution
- Log in to your Lightsail instance.
- Click the little terminal button to ssh into the machine.
- Execute the command to stop the instance:
sudo /opt/bitnami/ctlscript.sh stop apache - Regenerate the certificate:
sudo /opt/bitnami/letsencrypt/lego --tls --email="name@example.com" --domains="example.com" --domains="www.example.com" --path="/opt/bitnami/letsencrypt" renew --days 90- Execute the command to start the instance:
sudo /opt/bitnami/ctlscript.sh start apache - You might need to wait for the changes to propagate. For me I used another machine to test it out. I kept getting the warning on the same machine for some time at first.
References
- https://docs.bitnami.com/aws/how-to/generate-install-lets-encrypt-ssl/
- Barely used this one for the “Really Simple SSL” part: https://lightsail.aws.amazon.com/ls/docs/en_us/articles/amazon-lightsail-using-lets-encrypt-certificates-with-wordpress#request-a-lets-encrypt-certificate-wordpress
- Potential solutions for Let’s Encrypt DST Root CA X3 expiry on Sep 30th, 2021: https://docs.certifytheweb.com/docs/kb/kb-202109-letsencrypt/
I hope this tutorial was extensive and helped you out, please share it with others and subscribe for more content, I would really appreciate it! 🍻
Ledger Manager
Check out my iOS app which facilitates recording crypto transactions (Bitcoin, Ethereum, etc.), simplifies tax reporting & reports on overall net worth!
*Everything is synced privately on your iCloud account.
**Helps getting your crypto tax reporting in order (Form 8949) with smart calculation of cost basis & acquisition dates.
Thanks for writing this. I followed your instructions and they worked.
I did make a mistake in removing one of the domains in the parameter list in step 2.
–domains=”karlboghossian.com” –domains=”www.karlboghossian.com”
So now, I get a warning when entering with the “www.karlboghossian.com” address. What’s the best way to fix this?
Glad you found it helpful.
You should be able to repeat step 2 and regenerate the certificate. Or you can follow “OPTION 2: Automatically Renew Certificates Before They Expire” on how to make it auto-renew for you. In that command, make sure to use the same one I have there and place domains by yours.
Nice tutorial Karl!
I’m not an experience linux user. When I tried to change the permissons I got the next erro message.
> sudo chown root:root /opt/bitnami/apache2/conf/server*
> sudo chmod 600 /opt/bitnami/apache2/conf/server*
Errors:
chown: cannot dereference ‘/opt/bitnami/apache2/conf/server.crt’: No such file or directory
chown: cannot dereference ‘/opt/bitnami/apache2/conf/server.key’: No such file or directory
AND
chmod: cannot operate on dangling symlink ‘/opt/bitnami/apache2/conf/server.crt’
chmod: cannot operate on dangling symlink ‘/opt/bitnami/apache2/conf/server.key’
Can you help with this situation?
Hi Kike, I’m also not an experienced linux user myself 🙈. By looking at your error, it appears that the `/opt/bitnami/apache2/conf/` directory doesn’t actually house the `server.crt` and `server.key` files.
If you navigate there (`cd …`), do you see them? I presume not, in which case you can first navigate here: `/opt/bitnami/letsencrypt/certificates/` and see if there’s any generated files. If nothing in that directory, then repeat the STEP 2 in the tutorial.
After you make sure you have files under `/opt/bitnami/letsencrypt/certificates/`, then you can do STEP 3, which seems to me that something didn’t go right in this command:
`sudo ln -sf /opt/bitnami/letsencrypt/certificates/karlboghossian.com.key /opt/bitnami/apache2/conf/server.key`
⚠️ Make sure you replace “karlboghossian.com.key” with your actual file name! 🙂
The last command above pretty much makes the cert/key you generated in STEP 2 to have a symbolic link so that it can be accessed from here:
`/opt/bitnami/apache2/conf/server.key`
Hope that helps!
I’ve noticed for some reason that
sudo crontab -e and crontab -e is different files…
and if the changes aren’t made using the crontab -e command it won’t run…
Oh that’s interesting, so if you use crontab -e without sudo you’re not able to follow the steps successfully?
sudo crontab -e edits the crontab for the root user crontab -e edits the crontab for whichever user you are currently logged in as.
If you want a command in your crontab to run with root privleges you need to run it in the crontab for root.
So if you need to run “sudo certbot” then you would have to put it in the crontab for root.
Good tip Matthewe, thank you!
Hello Karl, thanks for sharing, it is very insightful as I am new to this.
I followed your instruction and I was successful in generating the SSL for my site. The only challenge is it was for a multisite with subdomains and they do not appear as secure. is there a way to fix this ?
Thanks in advance
Hello Alfred, sorry for the late response, I’ve been very busy at work. Unfortunately I haven’t tried on multisite with subdomains, so I’m not sure 😐. Were you able to figure it out?